The decarboxylation mechanism allows you to activate any and all cannabinoids within cannabis buds by heating them. This is used sometimes for decarboxylation shatter or other concentrates, but most commonly with tinctures for consumption and cooking.

Before you can use cannabis in your cooking, you first need to activate all of the useful cannabinoids. You’d be losing out on most of the potential benefits by consuming a tincture without decarboxylation. Through decarboxylation, kief and other substances can be created, however, this article is largely going to focus on decarboxylation for cooking.
What Is Decarboxylation?
Simply put, the decarboxylation of weed is the chemical reaction through which the THC and CBD in cannabis get activated to give euphoric and other beneficial side-effects.
While eating raw weed has some benefits, you wouldn’t be getting any of the trademark perks that the cannabinoids in the plant have to offer.
How Does Decarboxylation Occur?
Through the careful application of heat, the decarboxylation reaction occurs within the carboxylic acids in the weed, stripping a carbon atom from the carbon chain.
The decarboxylation of THC then releases a carboxyl group, which in turn makes your weed psychoactive.
As these cannabinoids share the same chemical composition, the decarboxylation of CBD and THC doesn’t differ. You don’t run the risk of suppressing the one in your quest to unlock the other.
Cannabis Decarboxylation Temperature
As with any form of baking, you need to be careful not to undercook your weed; you may leave much of the THC and CBD unactivated. You also want to take care not to overcook it since this may burn off these components and ruin the batch altogether.
Though cooking times may vary, the ideal decarboxylation temp at which the decarboxylation of cannabis takes place is in the range between 200 and 245 degrees Fahrenheit.
Cannabis Decarboxylation Chart
With any chemical process, the temperature and the duration are determining factors in the efficacy. While the journey of discovery through trial and error may appeal to you, you might also prefer not to potentially ruin a batch of your higher-grade bud.
Luckily, we’ve included an easy-to-use cannabis decarboxylation chart for you that tells you exactly which numbers to hit when decarbing your next batch. This will function essentially as a THC decarboxylation chart to give you a better idea of potency.

As you can see, the THC content directly determines the decarboxylation temperature, as well as the cooking times. Being familiar with the strain you’re decarbing goes a long way in getting the results you’re after.
Different Types of Decarboxylation
Now that you have a better idea of what the process entails, we’ll look at some of the proven ways to decarboxylate your weed and release the THC and CBD locked inside. Bear in mind that you can use the same parameters to decarboxylate your hash and kief as well.
Oven Decarboxylation
For most users, the oven tends to be the most straightforward way of decarboxylation. It’s easy to set the temperature, and if you’ve had a few hits before you started, the timer to get it just right.

What You Will Need
To get started, you’ll need your main ingredient, this being your bud, hash, or kief of choice. Make sure you have a good idea of what the THC % is to dial in your settings.
Next, you need an oven-safe dish or baking tray. Some baking paper may also help with cleanup and gathering the decarbed final product.
Bear in mind that some ovens may have a temperature variance of up to 10 degrees, so we recommend using a more accurate handheld thermometer. If you’re serious about getting the most potency from your cannabis, it’s a worthwhile investment.
How to Decarboxylate in an Oven
1. Preheat Your Oven
Using the THC and CBD decarboxylation chart provided, set your oven to the required temperature and wait until the indicator is ready. Alternatively, use your handheld thermometer to check the temperature periodically.
2. Prepare Your Baking Tray
Depending on your preference, line a baking tray with some baking paper or use a clean oven-safe dish to place your product in. You could use a special decarboxylation oven bag but a simple tray is fine.
3. Prepare Your Cannabis
Be sure to break up all the weed into equally sized parts and spread it out nice and evenly so that the heat can get to it from all sides.
4. Place Cannabis in the Oven
Next, place your weed in the oven and set your timer. Be sure to stick around so that you can pull it out the second it’s ready.
5. Cool for 30 Minutes
Place the baking tray or bowl in a safe area, away from draughts or potential hazards.
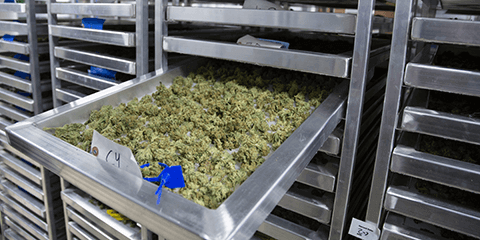
6. Store Your Decarboxylated Cannabis
Lastly, gather up your freshly decarboxylated batch and deposit it in a clean, airtight container for later consumption. Mason jars are a popular choice, rather than plastic bags, but anything dry and airtight will serve this purpose.
Mason Jar Decarboxylation
If you already have a clean mason jar and have concerns about neighbors and escaping aromas, this method is a fantastic option.

What You Will Need
Start with the desired amount of your weed of choice. You’ll also need an oven-safe mason jar, a kitchen towel, a baking tray, and of course, your heat source. You could use your oven for this method or even a pot of water on your stovetop.
If you’d prefer to use the pot of water, make sure you have an accurate way of measuring the water temperature as well. You may choose a regular handheld model or a cooking-specific thermometer for this purpose.
How to Decarboxylate in a Mason Jar
1. Preheat Your Oven or Ready Your Pot of Water
If you’re using an oven, be sure to set your desired temperature for the strain you’re decarboxylating. When using the hot water method, first place your jar in the cold water and slowly bring it up to temperature to minimize the risk of the jar breaking during extraction.
2. Break up Your Cannabis
Using your hands (or ideally a grinder), break the cannabis up into evenly sized pieces. This allows it to cook evenly.
3. Secure Your Weed in a Mason Jar
Place your weed in the mason jar and secure the lid. Be sure to leave it a bit loose to allow the weed to “breathe” and minimize the risk of your jar cracking.
4. Prepare Your Wet Towel and Baking Tray
If you’re using an oven, wet the towel and place it on your baking tray. This will allow your jar to heat evenly while preventing it from rolling all over the place.
5. Place Your Marijuana in the Oven
Place your tray into the oven and set the timer for the specified period. If you’re using a pot, bring the water up to the desired temperature first and set the timer from there.
6. Cool for 30 Minutes
Remove your tray from the oven and let the jar cool, again taking care to keep it in a safe place. If you’ve used the boiling water method, remove the jar from the pot and stand it aside to cool.
7. Store Your Mason Jar
Lastly, place your jar in a cool, dark place for later consumption.
Sous Vide Decarboxylation
Sous vide decarboxylation refers to the French term for cooking in a vacuum-sealed bag. This nearly foolproof method is also excellent for precise temperature control if you’re using an immersion circulator. It’s also another great way to contain any potential smells that may escape.

What You Will Need
If you find that you’ll be decarbing weed often, you may want to invest in an immersion circulator. Many consider immersion circulators to be excellent decarboxylation machines. A pot of hot water, a submersible thermometer, and a keen eye will serve the very same purpose, though.
You’ll also need a food-safe bag that’s capable of standing up to the heat. A zip-top bag will make it easy to use water displacement to create a vacuum. Ideally, an electric vacuum sealer would be an excellent investment if you decarb lots of weed. Lastly, you’ll want a few ounces of your preferred product.
How to Decarboxylate With the Sous Vide Method
1. Prepare Your Water Bath
Pour hot water into your pot and set your temperature. If you’re using a circulator, place it in your receptacle of choice and set the desired temperature.
2. Grind Cannabis Finely
Grind your weed to the desired consistency, making sure it’s all of a uniform size.
3. Place Your Weed in a Sealed Bag
Place the cannabis into the bag and create a vacuum. In the case of zip-top bags, you can leave a small section open and slowly submerge the bag in water, forcing the air out. Just be careful not to let any water into the bag.
An electric sealer will make this a much easier process and create a stronger vacuum than through the displacement method.
4. Submerge Your Bag for the Required Time
Once your water is up to the correct temperature, set your timer or the required length and wait it out while the magical chemistry does its work.
5. Remove and Cool for 15-20 Minutes
As soon as your timer goes off, remove your bag and allow it to cool. You may either store the bag as-is or transfer your weed to an airtight container of your choice.

Blog Categories
Top 10 Cannabis Seeds